Saturday, November 26, 2016

Making it up as you go along...


You may remember this piece of needlepoint, started a little while back.  It is intended as a panel for a little bag for daily use.

I began with a small hoard of crewel yarn, and thought myself very clever swapping in strands to create this ombre effect as the design reaches its centre.  Of course I took no notes, but left some of each shade for use as I worked the second half. 

Then, seven rows from the finish line, I ran out of a couple of key colours.  This was vintage yarn, bought in Oxfam, obviously the leftovers from someone else's project.  And it was very fine for crewel yarn.  A little internet searching brought me to an online supplier of the same yarn, so I am hopeful that I will be able to finish.  However, ordering some pale skeins for the background, along with the deep rusts need for the design itself has run up quite a little bill.  not such a cheap project after all.


This is one of a pair of fingerless mitts knitted recently, and made up as I went along.  In fact, the Newfoundland mitts gave me the basic stitch count - 42, increasing to 48 after the rib.  So then all I had to do was place the cables, taking care to reverse them for the other hand,  and do the increases for the thumb gusset at an appropriate rate.  I used the cable pattern from the stalled oatmeal cardigan, so I didn't even need a stitch directory.   The only modification I made on the second mitt was to decrease the cable stitches before casting off to tighten the finger edge.


However, on this version, I chose to place an elaborate motif on the back of the mitten.  I could have planned it on graph paper but that is never my style.  Instead, I saw how it went, and it almost worked.  On the second mitt I am placing the motif more centrally, but starting it earlier, before the thumb gusset, so that it will finish neatly before the cast-off edge.  Then I will probably ravel out mitt 1 and work it to match.   I m only able to visualise things while actually working them through.


This is Colchester Castle where there is an astounding collection of Roman artefacts, including complete glass vessels from that period.  We fitted in a visit while completing our Christmas shopping.  Most interesting was the jewellery known as the Fenwick hoard, brought to light in 2014 when a department store was excavating for an extension.  The items include long-service military arm bands as well as rings and ear-rings in the latest fashion.  It was all thought to have been buried by a couple just prior to Boudicca's visitation.  I have just read Rosemary Sutcliffe's "Song for a Dark Queen", a horrifying read.  These items certainly give personality to that ancient massacre.

Wednesday, November 23, 2016

Autumn? Winter....


 It being that time of year, we went north for the Literary Festival at the Roman museum in Maryport.  It was still possible to enjoy walks around the nature reserve, carpeted with leaves.  Indeed, in Essex, many trees are even now still in full leaf, shimmering with colour


 After we had heard Doug Scott, a renowned mountaineer, launching the festival with accounts of huddling in an ice-cave at 24,000 feet,we had some perspective on the rest of the weekend, when the weather took a sudden wintry turn.  In the distance, the Lakeland fells etched with snow.


This is Causey Pike, seen from the road around Bassenthwaite.


 Down on the Solway coast there was an almost eerie calm - but it was still as beautiful as ever.


 On Sunday afternoon, the biographer, Juliet Barker, talked about the Brontes and the importance of their imaginary worlds, with such engagement with her subject.  They were unique, she said, as a coterie of writers, three in the same family.  None of us could think of any other examples, although there are several acting and performing dynasties.  Why should this be, I wonder?

Two pairs of fingerless mittens: the first in the Newfoundland pattern.


And the second made up as I went along.


Both of these will be going off to Knit for Peace, to keep someone warm.


Wednesday, November 16, 2016

Notes on knitting Uncia 3

Funny how quickly details of the pattern fade, even though it was a fully immersive knit at the time. 

Chart D begins the beautiful panelled section, with diamond blocks outlined in various ways.

I found a big problem in moving through Row 249, at the start of Chart E.  It was the only section where I took it back several times without being able to resolve the issue.

M1, it explains in the Abbreviations, is meant to be a lifted increase, picking up the strand between the stitches and knitting, or purling, into the back of it.  But in Row 249, M1 follows or precedes a YO.  This caused me real problems, because whatever I was doing did not result in two stitches increased.  Eventually, I grasped where the strand was to come from in each case and was able to proceed, but I can still see where that section was in the finished piece.


Much later, in Chart H, you have to M1 on the wrong side, above a YO on the previous row, and this too seemed impossible.  I appear to have solved this by knitting into the front and back of the stitch instead of lifting a strand.  This gives what looks like a purl bump at the start of the elongated stitch, but I could not see another way to do it.  I doubt that anyone else would notice.

  With many types of knitting  the processes are really quite simple.  Most cables are easy once the basic process is grasped.  Lots of lace is like this too.  Uncia was different; the process was a constant challenge.  Once blocked, however, the lace blooms in all its glory.  It is a learning experience, but the finished product is spectacular.


Saturday, November 12, 2016

Notes on knitting Uncia 2

So, if you have made it through Charts A and B, you will have learned one or two things, as I did.  One is the importance of having right to hand both the general list of Abbreviations from inside the back cover, and also the specialised set for this pattern only.  Secondly, I learnt to tick off each row as I completed it - seems obvious but I wouldn't usually bother because I can usually read my knitting to find the place.  Since there are pattern elements on the Wrong side too it helps to have a quick way to check which side you are on.   I just looked back to the stocking stitch tail, but some people would put in a little safety pin.  It matters because you can't always just knit all the knits and purl all the purls as you would normally on a wrong-side row.

However, Chart C is at a different level completely.  You are knitting a really lovely set of Gothic arches. The first of these involves moving the twisted stitches to form a double row with columns between.  This is clear on the chart if you look carefully.


I tend to knit in the evenings, not always in good light, and I hit a problem on this chart which really made me pause for thought.  It was this.  I did not at first notice the difference between a crossed pair with a dot, meaning a purl, and a crossed pair with a curl, meaning knit tbl.  When I did realise this, it made me look much more closely, and by daylight, at all the other rather similar, but in fact distinct symbols being used.  Jean's advice was to read each row through to check for new devices before starting it; this was invaluable.  In fact, I was still reading each segment and rechecking as I went, but at least I did not feel I'd lost it completely.

It now becomes clear why Jean was aiming at five rows per day.

At the top of Chart C, you meet the first of the Twisted stitches which Jean described as having cats' whiskers.  What you are doing here is maintaining the line of the elongated slipped stitches, by moving other stitches behind them, and it is a lot less complicated than it sounds, once you get used to it.  However, at times this device is used alternately with other, similar but different, twisted and crossed pairs, so you have to keep a constant watch on the line of the chart to be sure.

Capping off each arch is a straightforward manoeuvre.  be sure to check the tiny number at the base of the symbol - it can be 3 or 5.

Correcting mistakes.

Obviously, I made some, but we haven't reached the most obvious one yet.  Mistakes become evident as you try to knit a Wrong side row and the numbers don't add up, probably because you have missed a YO or a K2tog.  Sometimes, and certainly later on, it was possible to restore these by just lifting a thread. On some knitting I would run a ladder down to the error to fix it, but Uncia has many diagonal cables and this would be a nightmare.   The best bet was to unknit stitch by stitch.  Taking back a few rows  by ripping out risked losing track of the row count, and of course, not being able to get the stitches back on the needle in the right order. 

So, all in all, your best move would be to knit at a work-table, charts and Abbreviations to hand, in strong light, and while you are able to concentrate fully on the pattern.  More than one hundred people have finished it, some of them more than once, so it isn't impossible.

Wednesday, November 09, 2016

Notes on knitting Uncia 1

So many new followers!  Welcome!  I do hope that you are not disappointed.

I realise that most of you have come on over from Jean's Knitting, lured by Uncia, and maybe thinking that you might like to try it yourself?  So I thought it might be helpful to record a few notes on the process, while it is still fresh in my mind.

Choice of yarn.

I just ordered the Fyberspates Pebble Beach kit from Kate Davies, along with "The book of Haps".  This seemed the simplest option, and it certainly works if you want your finished wrap to look like part of a cathedral: it's a very smooth, lace-weight Merino with just some light smudgings of darker colour.  But it is a rather austere colour choice, so you may want to forget the stonework and go for your favourite accent colour.  A smooth spun yarn is important because of the definition in the lace sections.

Managing the charts. 

These look pretty daunting, but you are only working your way through them one at a time, row by row, and all the rows are numbered.  I photocopied the pages for ease of handling.  You could enlarge them, and should if your eyesight is failing, as some of the symbols are very small.  I also copied P121 and P82 where the Abbreviations are explained, so that I could see them all together.  When I began working from the chart, I just paper-clipped a piece of card above the current row to keep track, as I would with a colour work chart.

Set-up rows

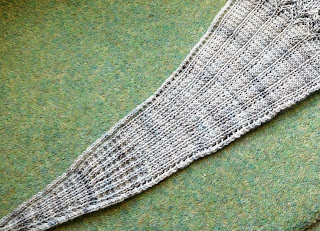
The pattern does not show a picture of these - the narrow end is tucked into Lucy's coat - so it was hard to visualise.  Essentially, you are knitting a series of ribs with a row of eyelets up each side edge.  As you add those extra stitches between the ribs, so the shape fans out.  m1p is easiest done by lifting the strand between stitches with your right hand needle on to your left hand needle before purling it.


Chart A

As soon as you reach Row 151 you realise the importance of having those explanations right to hand.  Lucy is fond of hiding increases within the pattern, and this is all that the strange device does.  It also caps off the columns with a section of small Gothic arches.

  Notice that the presence of a dot means that a purl is involved, whereas no dot means that both stitches are knitted.  The symbols then look like the process involved.  By now you are slipping stitches on the Wrong Side rows, so it elongates the rib stitches to give a continuous vertical line.  This follows on through the pattern.  Chart A appears at the lower edge of this picture.


Chart B

Now you are knitting a series of columns distinguished by a range of slipped and twisted stitches.  These continue the strong vertical lines of the piece.  It's one of the simpler charts, so enjoy it while you can.

Only Charts C,D,E,F,G, and H left to go! 

How helpful are these notes in fact?  Do please leave me a comment to let me know.


Sunday, November 06, 2016

Uncia dressed


Today I unpinned the now dry Uncia from the floor where it was blocking; weaving in the very few ends completed the job. 

Two things become evident: what a glorious piece of lace this is, and how difficult it is to wear in any way which would do it justice.  One could imagine someone tall in a very plain, flowing dress.  She might be able to carry it off.  I am not built on those lines, sadly.


It does actually represent a piece of fan vaulting, rising to that extravagant flowering of lace at the widest part.  

So - you ask about straightening wire with a drill.  Remember:  I am not advising you to try this at home.  But it did provide me with a pair of blocking wires for £2.99.

This is what the man said: Buy a coil of heavy duty garden uncoated garden wire.  Cut off more than the length needed. Tie one end round a post in your garden.  Grip the other end securely in the chuck of the drill.  Run the drill very slowly.  This straightens out the wire and makes it become rigid. 

We tried it and it worked, although I was imagining the wire suddenly whipping across the garden, so we took it very slowly.  We did not know whether running it clockwise or anti-clockwise made a difference.  Maybe we just got it right by chance.


This is the edging lace for Houlland, also from "The Book of Haps." 


Friday, November 04, 2016

Blocking Uncia

At my knitting group the other day, I found myself explaining what blocking is and how it would affect a piece of finished lace.  In the past, I would have pinned out the composite parts of a garment and given them a light press on the reverse, without soaking the pieces.  But blocking is a whole different matter.

First, I went across to the hardware store - Fork Handles - and bought a coil of garden wire.  The man in the shop told me an improbable method of straightening the wire with an electric drill.  I could foresee all sorts of bizarre accidents ensuing from this.  However, this morning I repeated the instructions to my husband who carried out the procedure and produced straight and rigid wire.  I needed two lengths to use on Uncia.


This is Uncia as it came off the needles, with the openwork and lace sections densely packed.


Fifteen minutes in a warm soak and a rinse and then I threaded the two wires down through the eyelets at each side.  Pinned out on an old tablecloth to dry, it looks like this.


Obviously we should now have  a glamour shot of Uncia being worn by some gamine young thing - no such person was to hand.   I fear that Uncia might come into the category of garment which wears you rather than you wearing it.  Hats off to the designer, Lucy Hague.

Wednesday, November 02, 2016

New Project

Blocking Uncia has been delayed by a trip to Cumbria.  But I needed a project for those long hours in the car.  What to take?


Some years ago I bought a little bag,  with an tapestry panel,
which has served me well, but is now beginning to show its age.  So, a replacement panel to start the process of constructing my own bag? 


Co Spinhoven's wonderful book of Celtic charted designs, some canvas and a batch of embroidery yarn from Renaissance Dyeing, all went into my travel bag.


Along the way I discovered that the canvas was eighteen strands to the inch - so pretty fine. The chart is on a grid, but would it be the right size for the purse front? A little judging by the eye and I set up the start row.  Very pleasing to find that the panel is less than half an inch larger than the original.


So now it grows.


The selection of yarns, which I picked up in Keswick Oxfam some years ago, contained some wonderful russets and a range of drab greens.  This being the season for glowing rusty oranges I decided to shade it through, swapping out strands from dark to pale.  The background will make use of the drab greens.  I'm very pleased with it so far.


Now, a few autumnal scenes.  We chose our walks to suit the season.  Low-level and through woodland, or up the Solway coast to enjoy the spectacle of birds in flight.


One very special walk took us up through the woods above Loweswater.  There we were enthralled to see a red squirrel about its squirrelly business on the ground - and a second one frisking about in the very canopy of the huge tree in front of us.


This was the only picture we got.  They move fast, those squirrels.


Another day, we sat down to eat our lunch on a tree stump washed up on the beach just opposite a huge mixed group of sea-birds, oyster-catchers, curlews, sanderlings.  As the tide fell, so skein after skein of oyster-catchers beat up along the shore to join the crowd already on the sand-bar.  It was a very dramatic display.